Getting started
If you buy jClamp you will need to register. After you install and run jClamp on the computer you want to use, press the registration button after running jClamp. Press the copy info button and paste all the info into an email to me. It looks like this :
----------------------------------------------------------------------------------------------
To: SciSoft Co.
joseph.santos-sacchi@yale.edu
http://www.SciSoftCo.com
Date: 03/17/07
Time: 10:55:24
Application: jClamp32.exe
Version: v. 17.0.0
System: Windows NT 5.1 (Build 2600)
Application path: C:\jClamp32
Registration code: [A40079BD 22585A 26A3654 10196A30 5E72F78]
----------------------------------------------------------------------------------------------
I will send you the hardware license file for jClamp or a link to download it. Alternatively, you can use the fulldemo license on the web for a month to check out the program with hardware, or you can use the built in math model to test the program.
Your hardware license is named <your_name.lic>. It may be zipped and named <your_name.zip>, and unzipping will extract the license file <your_name.lic>. Download and save the file. Do not open it – it is simply an encrypted text file. The file is necessary for jClamp to work with A/D-D/A hardware. Make a backup copy.
You should have installed jClamp into the default directory <C:\program files\jclamp32\>.
In that directory there is a default software only license named <jclamp32.lic>. You should rename that to <jclamp32_soft.lic>, copy your license file into the jClamp32 directory, and rename it <jClamp32.lic>. It should not be write protected.
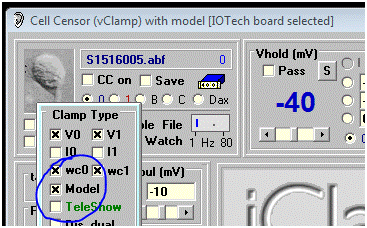
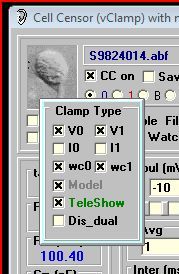
When you run jClamp you should be able to turn off model mode (in the ini file on startup, or in the pop up under the user graphic – see image below) to access hardware. You must make and load an ini file to access your hardware. See help file (accessible from jClamp Shortcut Bar or About button in menu bar in jClamp [opens on extreme left mouse movement] – see second image below) for further info on getting started.


--------------------------------------
There is a new method for communicating with a jClamper during experiments without interference during recording. A text file named "jcreadme.txt" can be placed in the jClamp32 directory at any time, e.g., remotely via network. This note will pop up at the start of jClamp or, if jClamp is running, when the Cell Censor is turned off. The note can be printed prior to exiting the window. Upon exiting, the file is deleted, but the information is stored in the file "jcreadme.bak".
Additionally, if a text message is present, the audio file named <jcreadme.wav> located in the jClamp <sounds> directory will be played. You can record your own audio message (using Windows sound recorder, for example) along with the text message or just play a notification sound when the text message opens. Just rename your recorded wav file to <jcreadme.wav> and place in the <sounds> directory. In the <sounds> directory there is a file <no_sound.wav> that can be copied and renamed to <jcreadme.wav> and/ or <giga.wav> so that no sound is played during the execution of these files within jClamp. jClamp now has a stand alone version of <jc_audio.exe> which can be used to record or play wav audio files, since Windows Vista does not have a sound recorder that does this. It is accessible in the jClamp directory or the jClamp start menu.
Using the jcreadme feature is a good way to remind yourself or another jClamper of something important!
When you restart jClamp the second time Windows will attempt to re-configure jClamp. This normal and should only happen once.”
--------------------------------------
Because the computer may crash if jclamp is run with the ini file set to a board that does not exist in the computer, the default jclamp.ini file is initially set to run in a built-in math model mode. To run with hardware, you should first set the board type and address, then disable model in the ini file under the
gain tab, or  uncheck the model checkbox while jclamp is running. Anytime you make changes to the ini file you must save the file and restart jClamp, or press the <re-ini> button on the Bar Menu. It is probably better to restart jClamp. The settings open in a pop-up window when you move the mouse over the graphic (default is a spiral ganglion cell – replace that graphic with a picture of individual jclamp users – set in ini file) in the upper left region of the Cell Censor window.
You must make sure all paths in the ini file match your machine's paths. For example, in the ini file default the directories are C:/program file/ jclamp32 but yours may be different. Make sure everything is set right in the ini file, and then save it as a different name -- like "your_name.ini". You can specify your ini file rather than the default jclamp32.ini by doing the following. <"C:\Program Files\jclamp32\JCLAMP32.EXE" my_ini_file.ini >.
If you find that the file <scrrun.dll> is giving problems, then it may be necessary to register it. Run the following on the command line
"REGSVR32.EXE C:\WINNT\system32\scrrun.dll"
Make sure your windows directories are correct. For win98, it may be "windows/system/".
You must disable User Account Control in Vista and Windows 7.
In Windows Vista, you may need to actually unregister some files that jClamp installs. This is a very strange bug for Vista! A batch file named <vista_unreg.bat> will be in the jclamp directory, and you should only need to double click on it. You may look at the contents with a text editor like notepad.
If you are using an old Labmaster DMA board then jClamp is useable without a license. Remember the free license is only available when the ini file is set to use the Labmaster board (under gain tab). Set the proper Port address! The Labmaster board is controlled exclusively through Port I/O with the jClamp VXD or SYS driver. The only differences with the hardware setup required by pClamp is that the ports A0-A7 should all be configured for output. A7 is scope trigger. See the hardware manual. B0 is trigger input. C channels are not used. Cm tracking and gap-free are functional only in Win 95/98, although 2-sine command protocols are supported. Win 2000 performance is superior. Normally, if there is no hardware license the registration window will appear, indicating that the license is software only or that so many days are left in the hardware fulldemo license. For the free labmaster support, there is no license, so the register window will open. If you want to bypass that window you may create a shortcut on the Windows desktop to jclamp32.exe, as you would do for any other program. In the properties window, target line, you should append the word "skip_reg". For example, <"C:\Program Files\jclamp32\JCLAMP32.EXE" skip_reg> is taken from the target line of a shortcut. It will run jclamp but not display the registration window. You could also specify a particular ini file other than the default jclamp32.ini by doing the following. <"C:\Program Files\jclamp32\JCLAMP32.EXE" my_ini_file.ini skip_reg>. Note there is a space after the executable name and between the ini filename and "skip_reg".
Gain setup in ini file
First check that the output is working.
Set the gain for DA to 0.001 in the textbox. Save the ini file. Restart jClamp or reinitialize. Set Vpulse to zero. Set the cc hold to 1000 mV and the meter connected to your output channel should read close to that. Verify that the output corresponds to changes in CC hold.
Now set the DA gain to that required for your amplifier. For example if you need 10 times the voltage set the gain to 0.01. Save the ini file. Restart jClamp or reinitialize. Verify that the output corresponds to 10 times the changes in cc hold.
Now that the DA is set correctly, you can set the AD scale. Remember to always set the DA scale first.
Use a model cell to check everything before doing real experiments!
