
Look32x!
Video capture with jClamp. This is a replacement for Look! and now supports VFW as well as DirectShow compatible devices – web cams and other cameras with driver support. I have tested out Logitech C300 web cam and perhaps it can be modified for microscope use. The Hauppauge video capture boards continue to work fine.
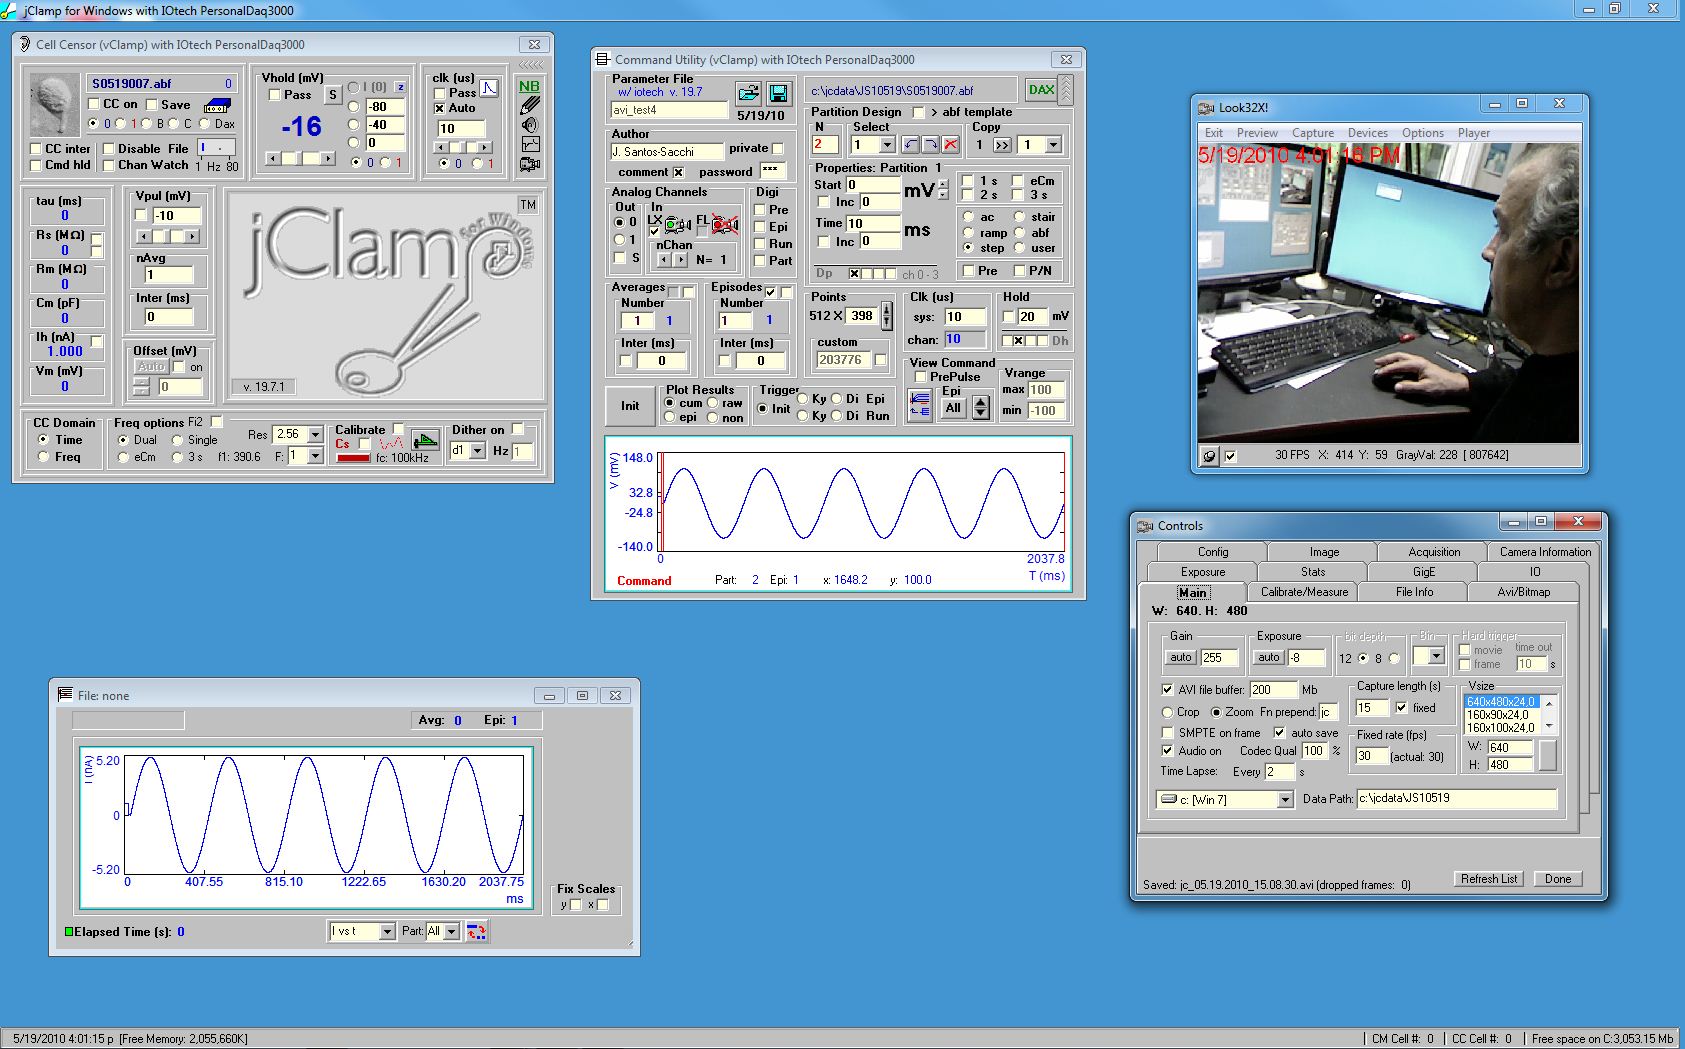
If a video device is present clicking on the camera icon in CC will open a window which allows viewing and saving camera output in a scaleable window. Streaming video capture and playback; record video during data collections; control through script or via Look32X! video window. A stand-alone video capture program, also called Look32X!, is available in the jClamp directory – useful to check that cameras are working, etc. It is accessable in the jClamp start menu. Check script command section and check menu on the Look32X! Window. I suggest a Hauppauge video (see www.hauppauge.com) capture card - WinTV PCI - you can get them without the TV tuner for less than $100. The default capture driver is number 0, but you can provide other numbers in the jClamp ini file under the "misc" tab – if you have multiple boards. Setting the driver number to 999 causes jClamp to skip the check for a board, and no capture will be available
As before, video can be captured via script files (see Script file help for commands). In addition, video capture can be synced to protocol capture. In the command utility if a supported camera is attached, you may select the LX check box in the Analog Channels area. When selected the light will turn green and indicates that synchronous video capture will be made when the protocol is run. Video capture will use the settings made in the Controls window (acessable from the Options tab in Look32X! window. Gain, exposure can be set here is the video device supports these features. Under the Options tab additional controls for video and audio are avaible from the camera manufacturer. You can preallocate a disk file to save video so that disk access is faster. Size needed depends on the codec used and length of recording. Play around to see what is best. If video is captured simultaneously with a protocol, the Capture length value in the text box is ignored and capturing stops after the protocol is run. Otherwise, the length may be fixed if collection is made directly from the Look32X! window or limited by disk space if the fixed length checkbox is unchecked. You must then stop capture manusally by clicking Stop Capture in Look32X1. Filename (Fn) prepend puts those letters at the beginning of the captured video file. Filenameing and directory path are set frome jClamp. If run alone, default data directory is “C:\Look32x_data\”. Manual naming can be enabled. The capture rate (frames per second [fps]) can be set in Controls or under Options tab. Time lapse capture can be done for extended periods of time. Video size (W and H) can be set in the Controls window or under Options tab in Look32X!. All settings are dictated by the camera driver supplied by the camera manufacturer. Multiple devices (cameras) can be chosen from if attached to the system. Preview must be set to capture video. Overlay can be used to simply monitor in near real-time – for example to get patches.
You can zoom in (if Zoom is selected in the Controls window) by pressing left mouse button down while dragging a box. You can crop (if Crop is selected in the Controls window) by doing the same. With cropping only that portion of the image is saved to disk during video capture. Bitmaps of video images (either jpeg or BMP formats) can be made during preview or playback.
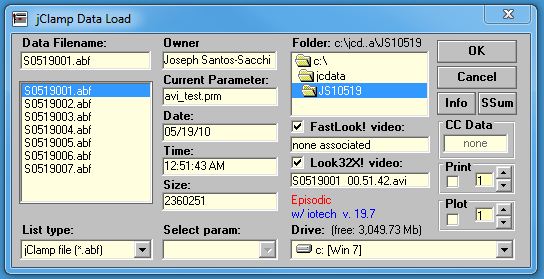
When loading data files, if a file has an associated video file it is listed. FastLook! Vda files are collected with Prosilica cameras (see FastLook! Help). If the check box near the video filename is unchecked then the video file is not loaded when the data file is loaded. Otherwise, data and video are loaded simultaneously (see below).
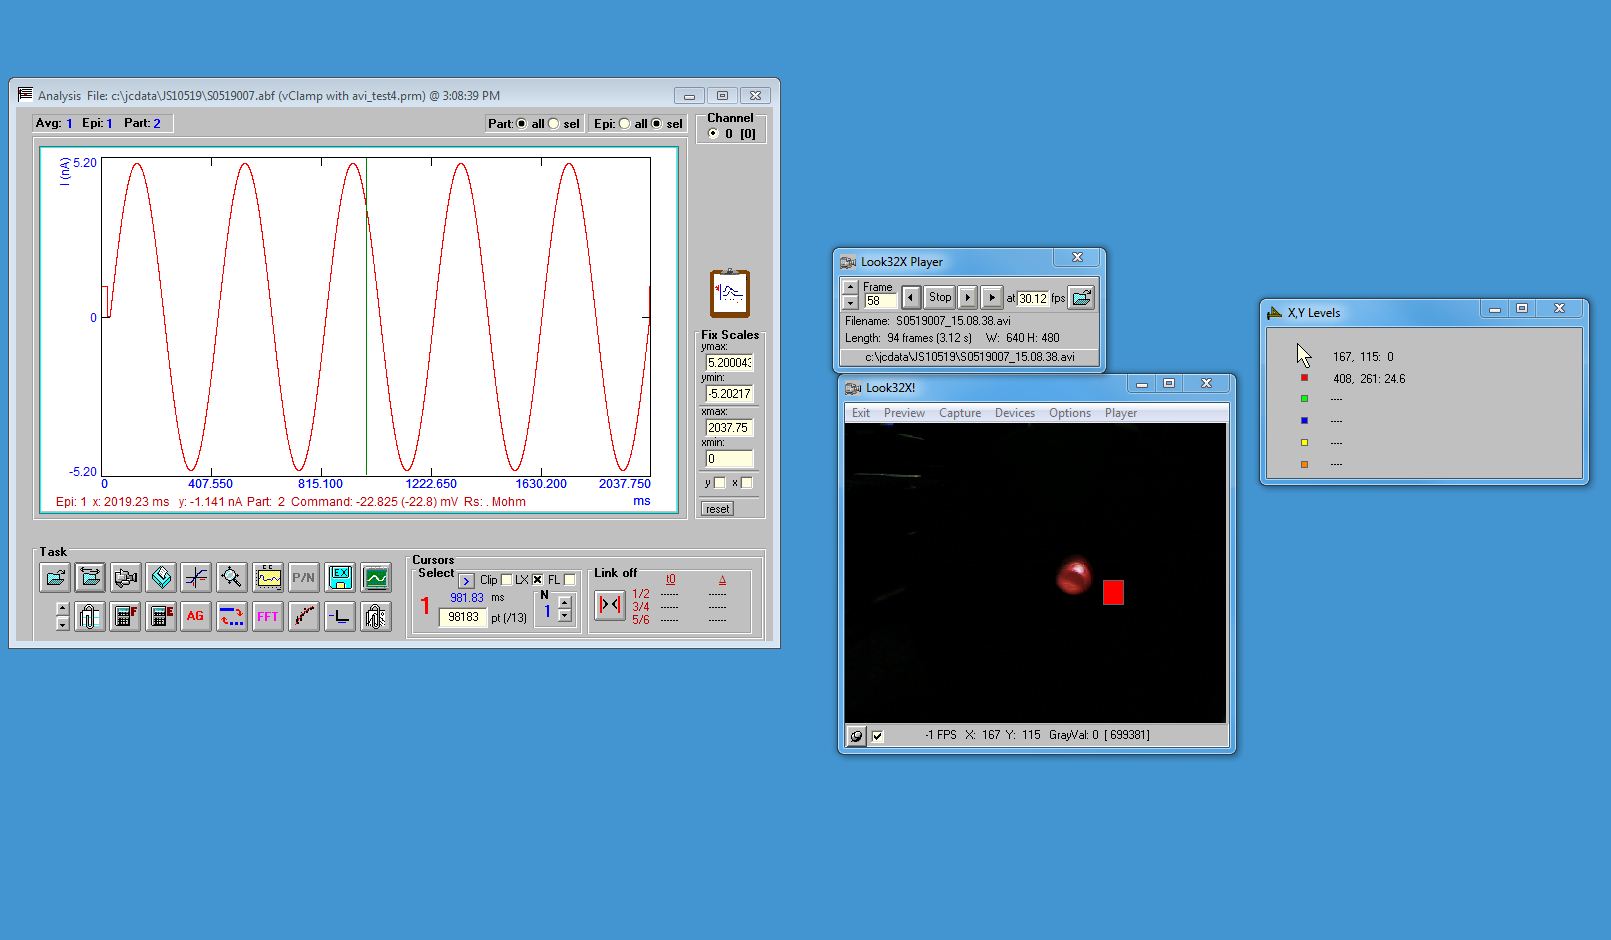
Video files, when loaded with associated data files are synchronized to the data. If you drag the data cursor in the Analysis Window the video will step through frames captured at the time denoted by the cursor. Alternately, you can step through frames in the Look32X Player and the cursor will move to the corresponding time. On either side of the stop button in the Player you can automatically step forward or backward. The rightmost button simply plays the video in real time. Synchronization can be turned on and off with the LX checkbox under Cursors area of the Analysis Window. If turned off the cursor no longer moves with the video, and all frames can be inspected (if synchronized, only frames within the data time frame are accessable). Rectangles can be drawn on the video image to monitor average gray level within the rectangle. Simply hold down the right mouse button and drag to size and release. Five areas can be set (red, green, blue, yellow, orange). Click once one the rectangle then move mouse to reposition; click again to dock. Double click on any rectangle to delete. The data are monitored in the X,Y Levels window. Position of upper left corner and value (0-255) are given for each rectangle and for mouse.
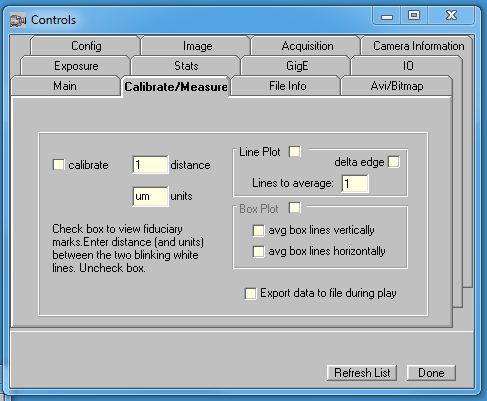
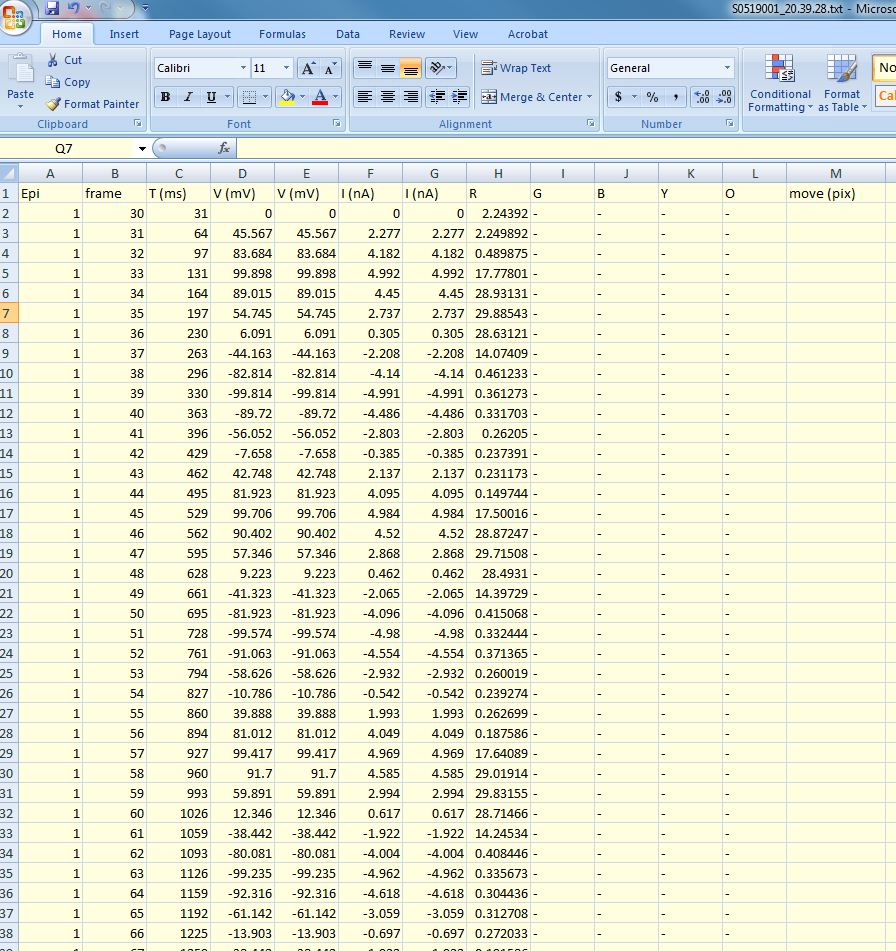
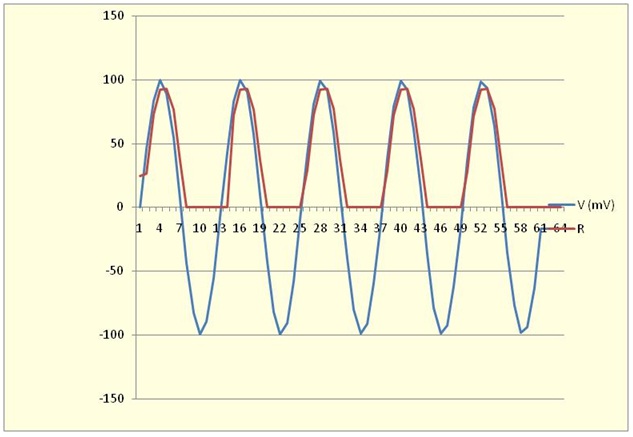
You can save data to disk if Export is set on in the Contols window (Measure tab). You can draw a line (or average a few lines) by holding shift down and dragging mouse with left button down. A plot of the intensity profile can be shown if Line Plot is checked. Below is a plot of the sinusoidal voltage (blue) that drove an LED (red), made in Excel (see below) from the text output during a Forward play. Whatever is plotted in the Analysis window is output (Im, Cm, Rm, Mag, Phase, etc.). Capture was a 30 FPS. You can see that there seems to be a delay between the two. It is not possible to get exact synchrony in Windows with DirectShow cameras. This is only possible with triggerable cameras like Prosilica’s (see FastLook help). You may try to better align video and data by using an alignment procedure posthoc in the Analysis window. Move the mouse over the LX checkbox and a window pops up. First place the cursor to a particular time where a fiduciary frame should be located. Enter the frame number to associate with that time and press set. Now the frame will be 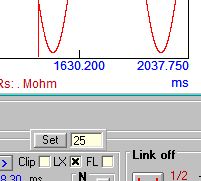 aligned to that time and all other frames appropriately shift in time. Check synchronization with an LED driven by voltage stimuli in a protocol. You may want to inset an LED into the periphery of the camera light path in the microscope in order to get fiduciary marks on video captures.
Under Devices, select Save Video IDs to create a files with camera identities and video size to use in Look32x ini file.
videodevice_unique identifiers.txt
;09-07-2017 08:19:08
;Computer: JSS-PC
;User: JSS
;device # 0 (Logitech Webcam Pro 9000) = pid_0809&mi_00#a&23882738&0&0000#
; 0: 640x480 1: 160x90 2: 160x100 3: 160x120 4: 176x144 5: 320x180 6: 320x200 7: 320x240 8: 352x288 9: 640x360 10: 640x400 11: 864x480 12: 768x480 13: 800x450 14: 800x500 15: 800x600 16: 960x720 17: 1280x720 18: 1280x800 19: 1280x1024 20: 1600x900 21: 1600x1000 22: 1600x1200 23: 640x480 24: 160x90 25: 160x100 26: 160x120 27: 176x144 28: 320x180 29: 320x200 30: 320x240 31: 352x288 32: 640x360 33: 640x400 34: 864x480 35: 768x480 36: 800x450 37: 800x500 38: 800x600 39: 960x720 40: 1280x720 41: 1280x800 42: 1280x1024 43: 1600x900 44: 1600x1000 45: 1600x1200
Look32x Ini File – these data can be set upon starting Look32X!
;look32x.ini
; semicolon is a comment
dev_ID0(pid_0795&mi_00#7&35830238&0&0000#)
dev_ID1(pid_0805&mi_00#8&ceef6f0&0&0000#)
capture_length(15); set the capture length to equal time in seconds
capture_timed(on); set capture length on/off
audio(on); set capture audio on/off
frame_rate(20); set fixed frame rate
;video_codec(DV Video Encoder);
video_codec(no compression);
audio_codec(PCM);
codec_quality(100);
time_lapse(2)
data_path:c:\look32x_data; set data path to c:\look32x_data ( the current date is automatically added as a subdirectory. e.g. c:\look32x_data\02-28-2010)
auto_save(on); auto or manual save -- manual asks for directory and filename
haup_input(2); hauppague video car input channel
image_scale(10);
image_units(um);3:31 PM 7/4/2013
;video cameras available - view in look32x devices; numbers in parentheses show device number which can change so use name to be sure
; but if more than one of the same camera then must use device number
;Logitech HD Webcam C615
;Logitech Webcam C160
;Logitech Webcam 300
;USB Video Device
main_vid_div_name(USB Video Device)
;main_vid_div_name(Logitech HD Webcam 300); use this for named device; if more than one same camera then must use device number
;main_vid_div_name(dev_ID0)
;main_vid_div(1); use this for device number
xy_format(70)
;main_aud_div(2)
;overlay_vid_div_name(dev_ID1); name of camera or the word <dev_ID1 or dev_ID0>
;overlay_vid_div(0)
;xy_format_overlay(16)
window_width(15000)
;window_height(19000)
window_top(500)
window_left(1000)
main_video_flip(0); 0 normal, 1 = horizontral flip, 2 = vertical flip, 3 = horizontal+vertical flip
overlay_video_flip(0); 0 normal, 1 = horizontral flip, 2 = vertical flip, 3 = horizontal+vertical flip
overlay_transparency(127);
overlay_size(0.63);
overlay_xshift(146)
overlay_yshift(5)
overlay_auto_exposure(1)
main_auto_exposure(1)
sensor_outline(5962:3663:8502:6097); shift draw box in overlay video to put numbers in contolr ovelay window then copy here to make default
sensor_outline_on(0); set to 1 to start with outline on or 0 to turn on video overlay
delete_file(c:/windows/system32/LogiDPPApp.exe); with _bak saved